Ge Profile Dishwasher Instruction Manual: A Comprehensive Guide
Welcome! This manual unlocks your GE Profile dishwasher’s potential‚ offering detailed instructions and insights for optimal performance and lasting satisfaction.
Congratulations on selecting a GE Profile dishwasher! This appliance represents a commitment to quality and innovation‚ designed to simplify your kitchen routine. This manual serves as your primary resource‚ guiding you through every aspect of operation‚ from initial setup to advanced features.
We’ve engineered this dishwasher with cutting-edge technology to deliver sparkling clean dishes‚ efficient water usage‚ and quiet operation. Familiarize yourself with the contents of this guide to fully leverage its capabilities. Proper use and maintenance‚ as outlined herein‚ will ensure years of reliable performance.
Safety Precautions & Important Warnings
Your safety is paramount. Before operating your GE Profile dishwasher‚ carefully read and understand all safety instructions. Disconnect electrical power before maintenance or cleaning. Never allow children to operate or play near the dishwasher.
Avoid storing flammable materials near the appliance. Use only GE-approved detergents and rinse aids. Do not tamper with safety devices. Improper installation or use can result in fire‚ electric shock‚ or injury; Always follow local codes and regulations during installation and operation.
Dishwasher Parts & Components Overview
Familiarize yourself with your dishwasher’s anatomy. Key components include the upper and lower spray arms‚ responsible for water distribution. The filter system prevents debris from recirculating‚ ensuring clean dishes. The detergent dispenser automatically releases detergent during cycles.
The adjustable rack system accommodates various dish sizes and shapes. Additional parts include the water inlet valve‚ drain pump‚ and control panel. Understanding these components aids in troubleshooting and maintenance‚ maximizing your dishwasher’s lifespan and efficiency.
Spray Arms – Upper & Lower
Essential for cleaning‚ the spray arms distribute water throughout the dishwasher. The upper spray arm focuses on delicate items in the top rack‚ while the lower spray arm tackles heavily soiled pots and pans. Regularly inspect the spray arms for clogs – food particles can obstruct water flow‚ reducing cleaning effectiveness.
Remove and rinse them periodically under running water to maintain optimal performance. Ensure free rotation for complete coverage. Damaged spray arms should be replaced to guarantee thorough cleaning cycles.
Filter System – Location & Types
Your GE Profile dishwasher utilizes a multi-stage filtration system to trap food particles and prevent redeposit onto dishes. Typically located at the bottom of the dishwasher tub‚ the system often includes a coarse filter for large debris and a fine filter for smaller particles.
Regularly cleaning these filters – at least monthly‚ or more often with heavy use – is crucial for optimal performance and preventing drain clogs. Consult the diagrams in this manual for specific location and removal instructions.
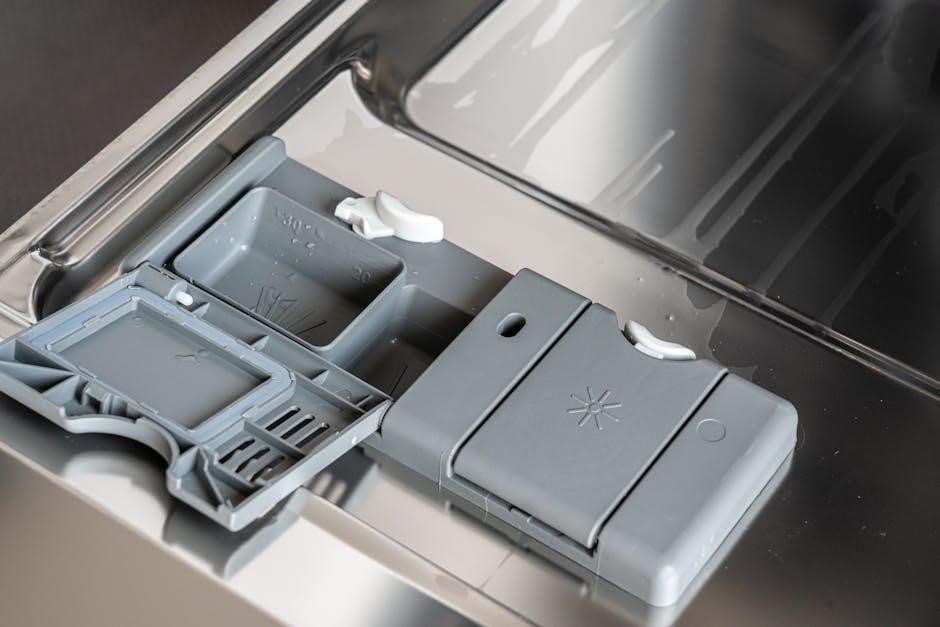
Detergent Dispenser – Functionality
The detergent dispenser automatically releases detergent during the wash cycle‚ ensuring optimal cleaning performance. Your GE Profile dishwasher features a dispenser cup with markings to indicate fill levels for different soil levels.
Always use fresh‚ quality dishwasher detergent and avoid overfilling. Some models have a pre-wash compartment for heavily soiled dishes. Ensure the dispenser door latches securely to prevent premature detergent release. Refer to the ‘Detergent Usage’ section for specific recommendations.
Rack System – Adjustable Features
Your GE Profile dishwasher’s rack system is designed for maximum flexibility. The upper rack is often adjustable in height‚ accommodating taller items like glasses or vases. Many models feature adjustable tines on both racks‚ allowing customization for various dish sizes and shapes.
Fold-down tines provide extra space for large pots and pans. Check your model’s specific features‚ as some offer sliding racks or specialized holders for delicate items. Proper rack adjustment maximizes cleaning efficiency and prevents damage.
Getting Started: Initial Setup

Before first use‚ ensure proper installation. Carefully review all included documentation regarding water supply connection‚ drain hose installation‚ and electrical requirements. Verify the dishwasher is level to ensure optimal performance and prevent leaks. Connect the water supply line‚ ensuring a secure fit to avoid issues.
Proper grounding is crucial for safety. Double-check all connections before powering on the unit. Run an initial test cycle without dishes to flush the system and confirm everything functions correctly.
Water Supply Connection
Connect to a hot water line using a new‚ approved dishwasher supply hose. Avoid using old hoses to prevent leaks. The water pressure should be between 20 and 120 psi. Shut off the main water supply before connecting.
Ensure a tight connection at both the dishwasher and the water supply valve. Check for leaks immediately after turning the water back on. Use Teflon tape on threaded connections for a secure‚ watertight seal.
Drain Hose Installation
Attach the drain hose to the designated drain fitting under your sink‚ ensuring it’s securely clamped to prevent dislodgement. The hose should loop high under the sink before connecting to avoid backflow.
Never connect the drain hose directly into a garbage disposal unless the disposal’s knockout plug has been removed. Ensure the hose isn’t kinked or crushed‚ restricting water flow. Proper installation prevents messy backups!
Electrical Connection & Grounding
Connect the dishwasher to a dedicated 120V‚ 60Hz electrical circuit‚ protected by a 15-amp or 20-amp circuit breaker. Proper grounding is crucial for safety; use the provided grounding wire and connect it to a properly grounded electrical outlet.
Do not use extension cords or adapters. If the electrical supply is damaged‚ discontinue use and contact a qualified technician. Incorrect wiring can cause hazards!
Control Panel Explained
The GE Profile dishwasher’s control panel offers intuitive operation. It features a clear digital display and easy-to-use buttons for cycle selection and customized options. Explore the various cycles – Normal‚ Heavy‚ Delicate‚ and more – to suit your dishwashing needs.
Utilize option buttons like High Temp Wash‚ Sanitize‚ and Delay Start to enhance cleaning performance and convenience. Familiarize yourself with the panel for efficient operation!
Cycle Selection Guide

Choosing the right cycle is crucial for optimal cleaning. The Normal cycle is perfect for everyday loads with moderate soiling. For heavily soiled pots and pans‚ select the Heavy Duty cycle for powerful cleaning action. Delicate cycles gently clean fragile items like glassware.
Quick Wash offers a faster cleaning option for lightly soiled dishes. Auto cycle intelligently adjusts settings based on soil levels. Rinse Only is ideal for pre-rinsing or holding dishes.

Option Buttons – High Temp‚ Sanitize‚ etc.
Enhance your wash with specialized options! The High Temp Wash boosts water temperature for improved grease removal and sanitation. Sanitize utilizes higher temperatures to eliminate bacteria‚ ideal for baby bottles. Heated Dry ensures sparkling‚ spot-free results. Delay Start allows convenient scheduling‚ running the dishwasher during off-peak hours.
The Power Wash option increases spray pressure for stubborn food residue. Sani Rinse provides an extra rinse with hot water for added hygiene.
Loading Your Dishwasher Correctly
Optimal loading maximizes cleaning performance! Face soiled surfaces towards the spray arms. Avoid overcrowding; dishes need space for water circulation. Secure lightweight items to prevent shifting during the wash cycle. Check spray arm rotation after loading to ensure unobstructed access.
Proper loading prevents re-washing and ensures sparkling clean results. Load similar items together for efficient use of cycles. Avoid blocking the detergent dispenser.
Upper Rack Loading Tips
Prioritize delicate items like glasses‚ cups‚ and small bowls on the upper rack. Ensure items are securely placed in the tines to prevent movement. Avoid placing tall items that could obstruct the lower spray arm’s rotation. Load plastic items away from the heating element to prevent melting.

Adjust the rack height if needed for larger items. Face openings downwards to allow for proper water drainage. Don’t overload the upper rack‚ as this can hinder cleaning effectiveness.
Lower Rack Loading Tips
Place larger‚ heavier items like pots‚ pans‚ and baking dishes on the lower rack. Ensure items face the center for optimal spray coverage. Avoid blocking the detergent dispenser with tall items. Secure items to prevent shifting during the wash cycle.
Load plates and bowls facing inwards. Check spray arm clearance before starting the dishwasher. Don’t overcrowd the lower rack‚ allowing water to reach all surfaces effectively.
Detergent Usage & Recommendations
Use only dishwasher detergent specifically designed for automatic dishwashers. Avoid hand dish soap‚ as it creates excessive suds. Follow detergent package instructions for proper dosage‚ adjusting for water hardness. Consider using a detergent pod or gel for convenience.
For heavily soiled dishes‚ a slightly increased amount of detergent may be necessary. Ensure the dispenser is dry before adding detergent. Store detergent in a cool‚ dry place to maintain its effectiveness.
Using Rinse Aid for Spotless Dishes
Rinse aid minimizes water spots and film‚ leaving dishes sparkling clean. Locate the rinse aid dispenser‚ typically near the detergent compartment. Fill the dispenser until the indicator window shows full. Adjust the rinse aid level using the control panel settings – higher settings for hard water.
Regularly check the rinse aid level and refill as needed. Using rinse aid is especially beneficial with hard water or when using certain detergents. It promotes faster drying and enhances overall dishwashing results.
Understanding Dishwasher Cycles
Your GE Profile dishwasher offers various cycles tailored to different cleaning needs. The Normal cycle is ideal for everyday dish loads‚ providing efficient cleaning with moderate water usage. The Heavy Duty cycle tackles baked-on food and stubborn stains on pots and pans‚ utilizing higher temperatures and extended wash times.
Explore other cycles like Quick Wash for lightly soiled dishes‚ or Delicate for fragile items. Refer to the control panel for cycle descriptions and estimated run times. Selecting the appropriate cycle ensures optimal cleaning performance and energy efficiency.
Normal Cycle – Everyday Use
The Normal cycle is your go-to setting for routinely soiled dishes – glasses‚ plates‚ and everyday cookware. It balances cleaning power with water and energy conservation‚ making it an eco-friendly choice. This cycle typically runs for approximately 120-150 minutes‚ depending on model variations and selected options.
For best results‚ ensure dishes are scraped of large food particles before loading. Use a quality dishwasher detergent and consider adding rinse aid for sparkling‚ spot-free finishes. The Normal cycle delivers consistently clean dishes without excessive resource consumption.
Heavy Duty Cycle – Pots & Pans
The Heavy Duty cycle is specifically designed to tackle baked-on food residue on pots‚ pans‚ and heavily soiled dishes. This powerful cycle utilizes higher water temperatures and increased wash pressure for superior cleaning performance. Expect a longer runtime‚ typically between 180-210 minutes‚ to ensure thorough removal of stubborn messes.
Pre-soaking heavily soiled items is recommended for optimal results. Use a generous amount of detergent and consider the ‘High Temp’ wash option for enhanced cleaning. This cycle is ideal for cookware that requires intense cleaning action.
Troubleshooting Common Issues
Encountering problems? This section addresses frequent concerns with your GE Profile dishwasher. Before contacting support‚ review these simple solutions. If the dishwasher won’t start‚ check the power supply‚ door latch‚ and control panel lock. For poor cleaning‚ verify proper loading‚ detergent usage‚ and water temperature.
Persistent issues like unusual noises or leaks require professional attention. Consult the error code section for specific diagnostics. Always disconnect power before attempting any repairs.
Dishwasher Not Starting
Is your GE Profile dishwasher failing to initiate a cycle? First‚ ensure the power cord is securely plugged into a functioning outlet. Check your home’s circuit breaker or fuse box for tripped breakers or blown fuses. Verify the door is fully latched; a slightly open door prevents operation. Inspect the control panel lock feature – disable it if activated.
If these steps don’t resolve the issue‚ a control panel malfunction may be present‚ requiring professional service.
Dishes Not Cleaning Properly
Are your dishes emerging from the wash cycle still bearing food residue? Begin by confirming proper loading – avoid overcrowding and ensure spray arms aren’t obstructed. Verify sufficient detergent is used‚ selecting the appropriate type for your water hardness. Check the filter for clogs and clean it thoroughly.
Inspect the spray arms for blockages; remove any debris. Ensure water temperature reaches at least 120°F. Consider using rinse aid for improved drying and spot prevention.
Cleaning & Maintaining Your Dishwasher
Regular maintenance ensures optimal performance and longevity. Begin by cleaning the filter after every few cycles to remove food particles and prevent clogs. Wipe down the door and control panel with a damp cloth and mild detergent. For stainless steel interiors‚ use a dedicated stainless steel cleaner to prevent streaks and maintain shine.
Run an empty cycle with dishwasher cleaner monthly to eliminate odors and buildup. Inspect the spray arms for blockages and clean as needed.

Filter Cleaning Procedure
Locate the filter assembly‚ typically at the bottom of the dishwasher. Remove the lower rack for easier access. Twist and lift the filter components – usually a cylindrical filter and a flat mesh filter. Rinse thoroughly under running water‚ using a soft brush to remove stubborn debris.
Inspect the filter housing for any remaining particles and clean it as well. Reassemble the filter correctly‚ ensuring a secure fit. A clean filter is crucial for optimal cleaning performance.
Interior Cleaning – Stainless Steel Care
Regularly wipe down the dishwasher’s interior‚ especially stainless steel components‚ with a damp cloth and mild detergent. Avoid abrasive cleaners‚ steel wool‚ or scouring pads‚ as these can scratch the surface. For stubborn water spots or fingerprints on stainless steel‚ use a stainless steel cleaner and polish.
Rinse thoroughly after cleaning to remove any residue. Maintaining a clean interior prevents odors and ensures optimal dishwasher performance and longevity.
GE Profile Dishwasher Error Codes & Meanings
Error codes indicate specific issues within your dishwasher. Code “E1” often signals a water inlet valve problem‚ while “E2” points to a drain blockage. “E3” typically means a heating element failure‚ and “E4” suggests a water level sensor malfunction.
Consult the full error code list in this manual or on the GE Appliances website for detailed troubleshooting steps. Record the code before contacting customer support for faster assistance.
Winterizing Your Dishwasher
Protect your dishwasher during freezing temperatures! First‚ disconnect the power and water supply. Next‚ drain all remaining water from the dishwasher‚ including the drain hose – use a wet/dry vacuum if needed. Then‚ pour RV antifreeze into the bottom of the dishwasher.
Run a short cycle to distribute the antifreeze. Leave the door slightly ajar to prevent mold and mildew. This prevents costly freeze damage!
Extended Absence Care
Planning a long vacation? Protect your GE Profile dishwasher! First‚ turn off the dishwasher at the circuit breaker. Next‚ shut off the water supply valve to prevent leaks. Then‚ run a normal cycle with dishwasher cleaner to sanitize the interior.
Leave the door slightly ajar to allow air circulation and prevent mildew. Consider removing and storing the racks to further protect them during prolonged inactivity.
Warranty Information & Registration
Your GE Profile dishwasher comes with a comprehensive warranty protecting against manufacturing defects. Typically‚ this includes one year of limited warranty coverage for parts and labor. Extended warranties are often available for purchase‚ offering additional peace of mind.
Register your appliance online at the GE Appliances website to activate your warranty and receive important product updates. Keep your purchase receipt as proof of purchase for any warranty claims.
GE Appliances Customer Support Contact Details
For assistance with your GE Profile dishwasher‚ our dedicated customer support team is readily available. You can reach us by phone at 1-800-GE-CARES (1-800-432-2737). Alternatively‚ visit our website at www.geappliances.com for FAQs‚ troubleshooting guides‚ and online chat support.
Our support hours are typically 7 AM to 10 PM EST‚ seven days a week. Please have your model and serial number handy when contacting us for faster service;
Smart Features & Connectivity (If Applicable)
Your GE Profile dishwasher may offer smart connectivity features via the SmartHQ app. Download the app to remotely control your dishwasher‚ monitor cycle progress‚ and receive notifications. Voice control is also available through compatible smart home devices like Google Assistant or Amazon Alexa.
Enable Wi-Fi connectivity through the dishwasher’s control panel to unlock these features. Regular software updates ensure optimal performance and introduce new functionalities.
Energy Saving Tips & Efficiency
Maximize energy efficiency by utilizing the Eco cycle‚ designed for lightly soiled dishes‚ reducing water and energy consumption. Avoid pre-rinsing dishes excessively; modern detergents are effective at removing food particles. Run full loads whenever possible to optimize water usage per cycle.

Utilize the delay start feature to run the dishwasher during off-peak energy hours. Ensure proper loading to allow for efficient water circulation‚ minimizing the need for re-washing.
Recycling Information & Disposal Guidelines
Responsible disposal is key! When retiring your GE Profile dishwasher‚ do not simply discard it. Check local regulations for appliance recycling programs and designated drop-off locations. Many components‚ like metal and plastic‚ are recyclable.
Contact your local waste management authority for specific guidelines. Consider donating a working appliance to a charitable organization. Properly disconnect all utilities before disposal or recycling to ensure safety.
Frequently Asked Questions (FAQ)
Q: Why isn’t my dishwasher starting? Ensure the door is fully latched and the power cord is securely plugged in. Q: Dishes aren’t drying – what’s wrong? Verify rinse aid is filled and selected. Q: What cycle should I use for heavily soiled pots? The Heavy Duty cycle is recommended.
Q: How often should I clean the filter? Monthly cleaning is advised for optimal performance. Q: What do error codes mean? Refer to the Error Codes section for detailed explanations.